
Bali 2026 Important Information to Read ASAP

OFFICIAL ASPECTS OF TRAVELING TO BALI- VERY IMPORTANT INFO
PASSPORT
Please be sure you have validity on your passport beyond 21/12/2026 ( six months after the retreat)
Make sure your passport is in good condition as I have heard ratty ones are problematic.
VISAS
There are three visas you need to enter Bali. The information about them is in the colour blocks below. If you get stuck, let me know which colour block you’re on so I can assist! Please note that the visa requirements changed at the end of 2025, so even if you went to Bali last year and feel you know how to do these, you’ll need to follow these updated instructions. Also, I know many of us are starting our trips at other hotels on the island, but as Soulshine is the main accommodation that seems to be the obvious one to use for the official documents.
You can apply for the visas online before you travel.
PLEASE ONLY USE THE LINKS IN THIS DOCUMENT TO APPLY FOR YOUR VISAS.
VISA #1. E-Visa for Indonesia - EVOA B1
The EVOA will automatically be linked to your passport number once it is approved. You will be asked to show it at Immigration.
This is a visa for 30 days. It is valid for 90 days after it has been approved, so you can apply for it now.
You want a B1 30-day Visa for Tourism.
It costs about $60AU ( RP 500.000 )
This is a tedious application form. Make a pot of tea and just breathe through it! You will probably find that the online form is a bit slow to respond to the information inputs as you go. This is normal so don’t worry. Just be patient.
Be ready with these images:
· Your passport (main, single page) as a landscape JPG or PNG file
· Your passport (main, single page) as a landscape PDF file
· Your profile picture ( from just below your chest to just above your head ) as a portrait JPG or PNG file
· Your RETURNING airline ticket as a PDF file.
(They only want to see the returning flight, not the flight that brings you to Bali.)
You will be asked for the different formats of images on the various application pages. Breathe.
Use this link to apply for the visa https://evisa.imigrasi.go.id/
Follow these prompts so you don’t mess it up!
1 Choose your nationality in the dropdown list
2 The main purpose for the visit to Indonesia is GENERAL, FAMILY OR SOCIAL
3 The sub-purpose of the visit to Indonesia is TOURISM, FAMILY VISIT & TRANSIT
4 Choose this visa: B1 VISA (TOURIST ON ARRIVAL)
5 You are planning to stay 30 DAYS
You should be quoted RP 500.000 on the next page detailing the visa.
Then press APPLY.
You will asked to upload your passport pic as a jpeg file. Check through the details which will auto-fill the sections and make sure they are right.
The next pic to upload is your profile pic in jpeg format.
The next page, called the Payment page, will want some more of your details including the place of birth and also your phone number in international format with no spaces. ( For me that’s 61419580864.)
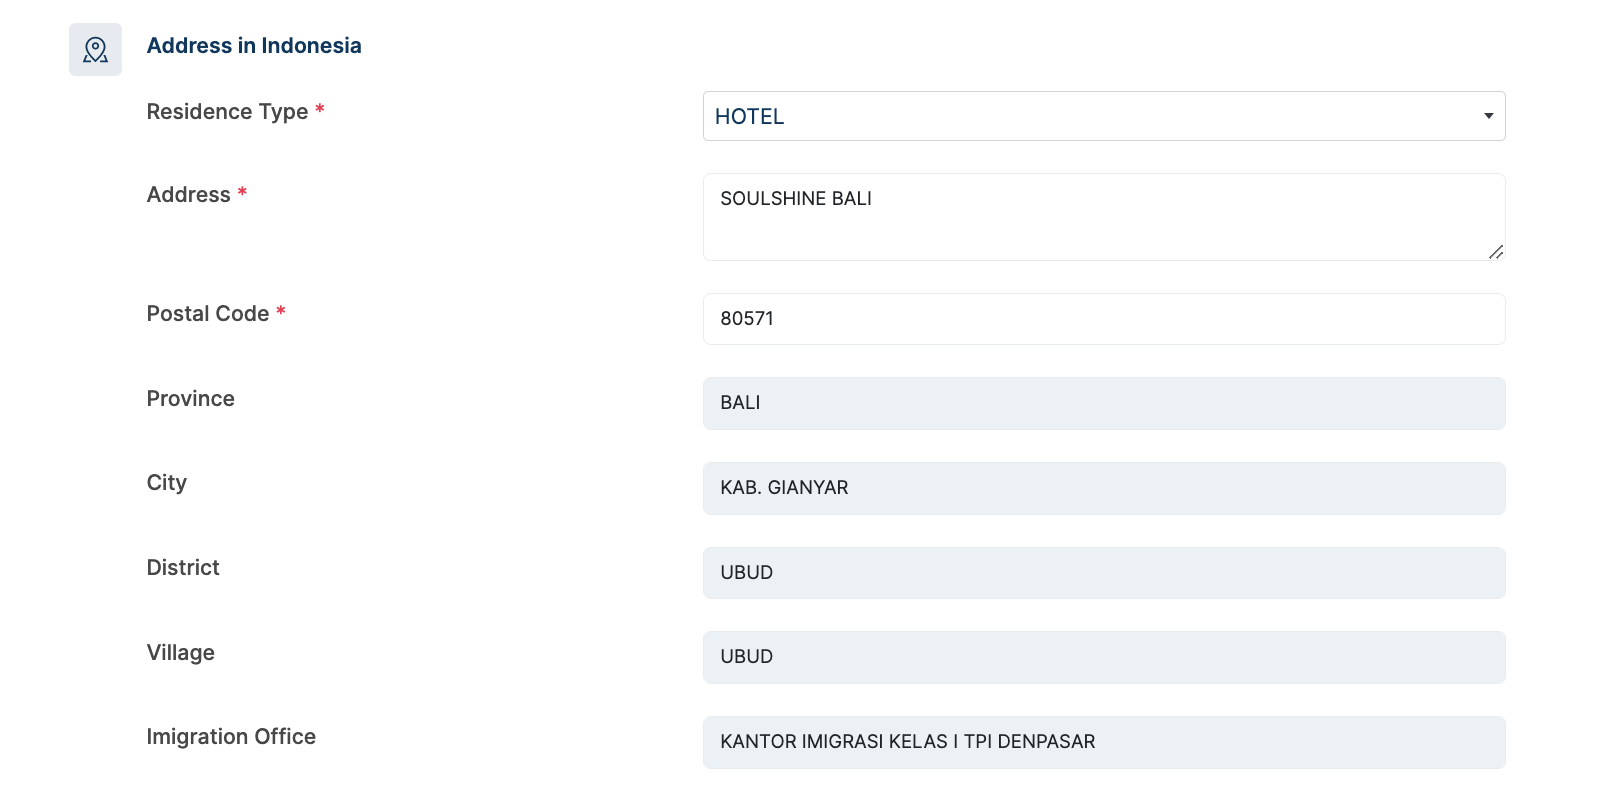
INDONESIAN ADDRESS DETAILS
This is the most headache inducing part of the process.
1. You’ll see “RESIDENCE TYPE”. Choose “HOTEL”.
2. Then skip to the Postal Code field which is 80571
3. You’ll then see some fields magically propagate themselves.
4. Then, last of all, fill the field titled ADDRESS. Write “SOULSHINE BALI ”.
The full address for your own records is:
Soulshine Bali
Jl. Ambarawati
Kecamatan Ubud, Kabupaten Gianyar
80571
Bali
Next it will ask for a PDF of your flight home. They just want to be sure you don’t plan to stay beyond your 30 days.
Next another pic of your passport is needed, but this time as a PDF.
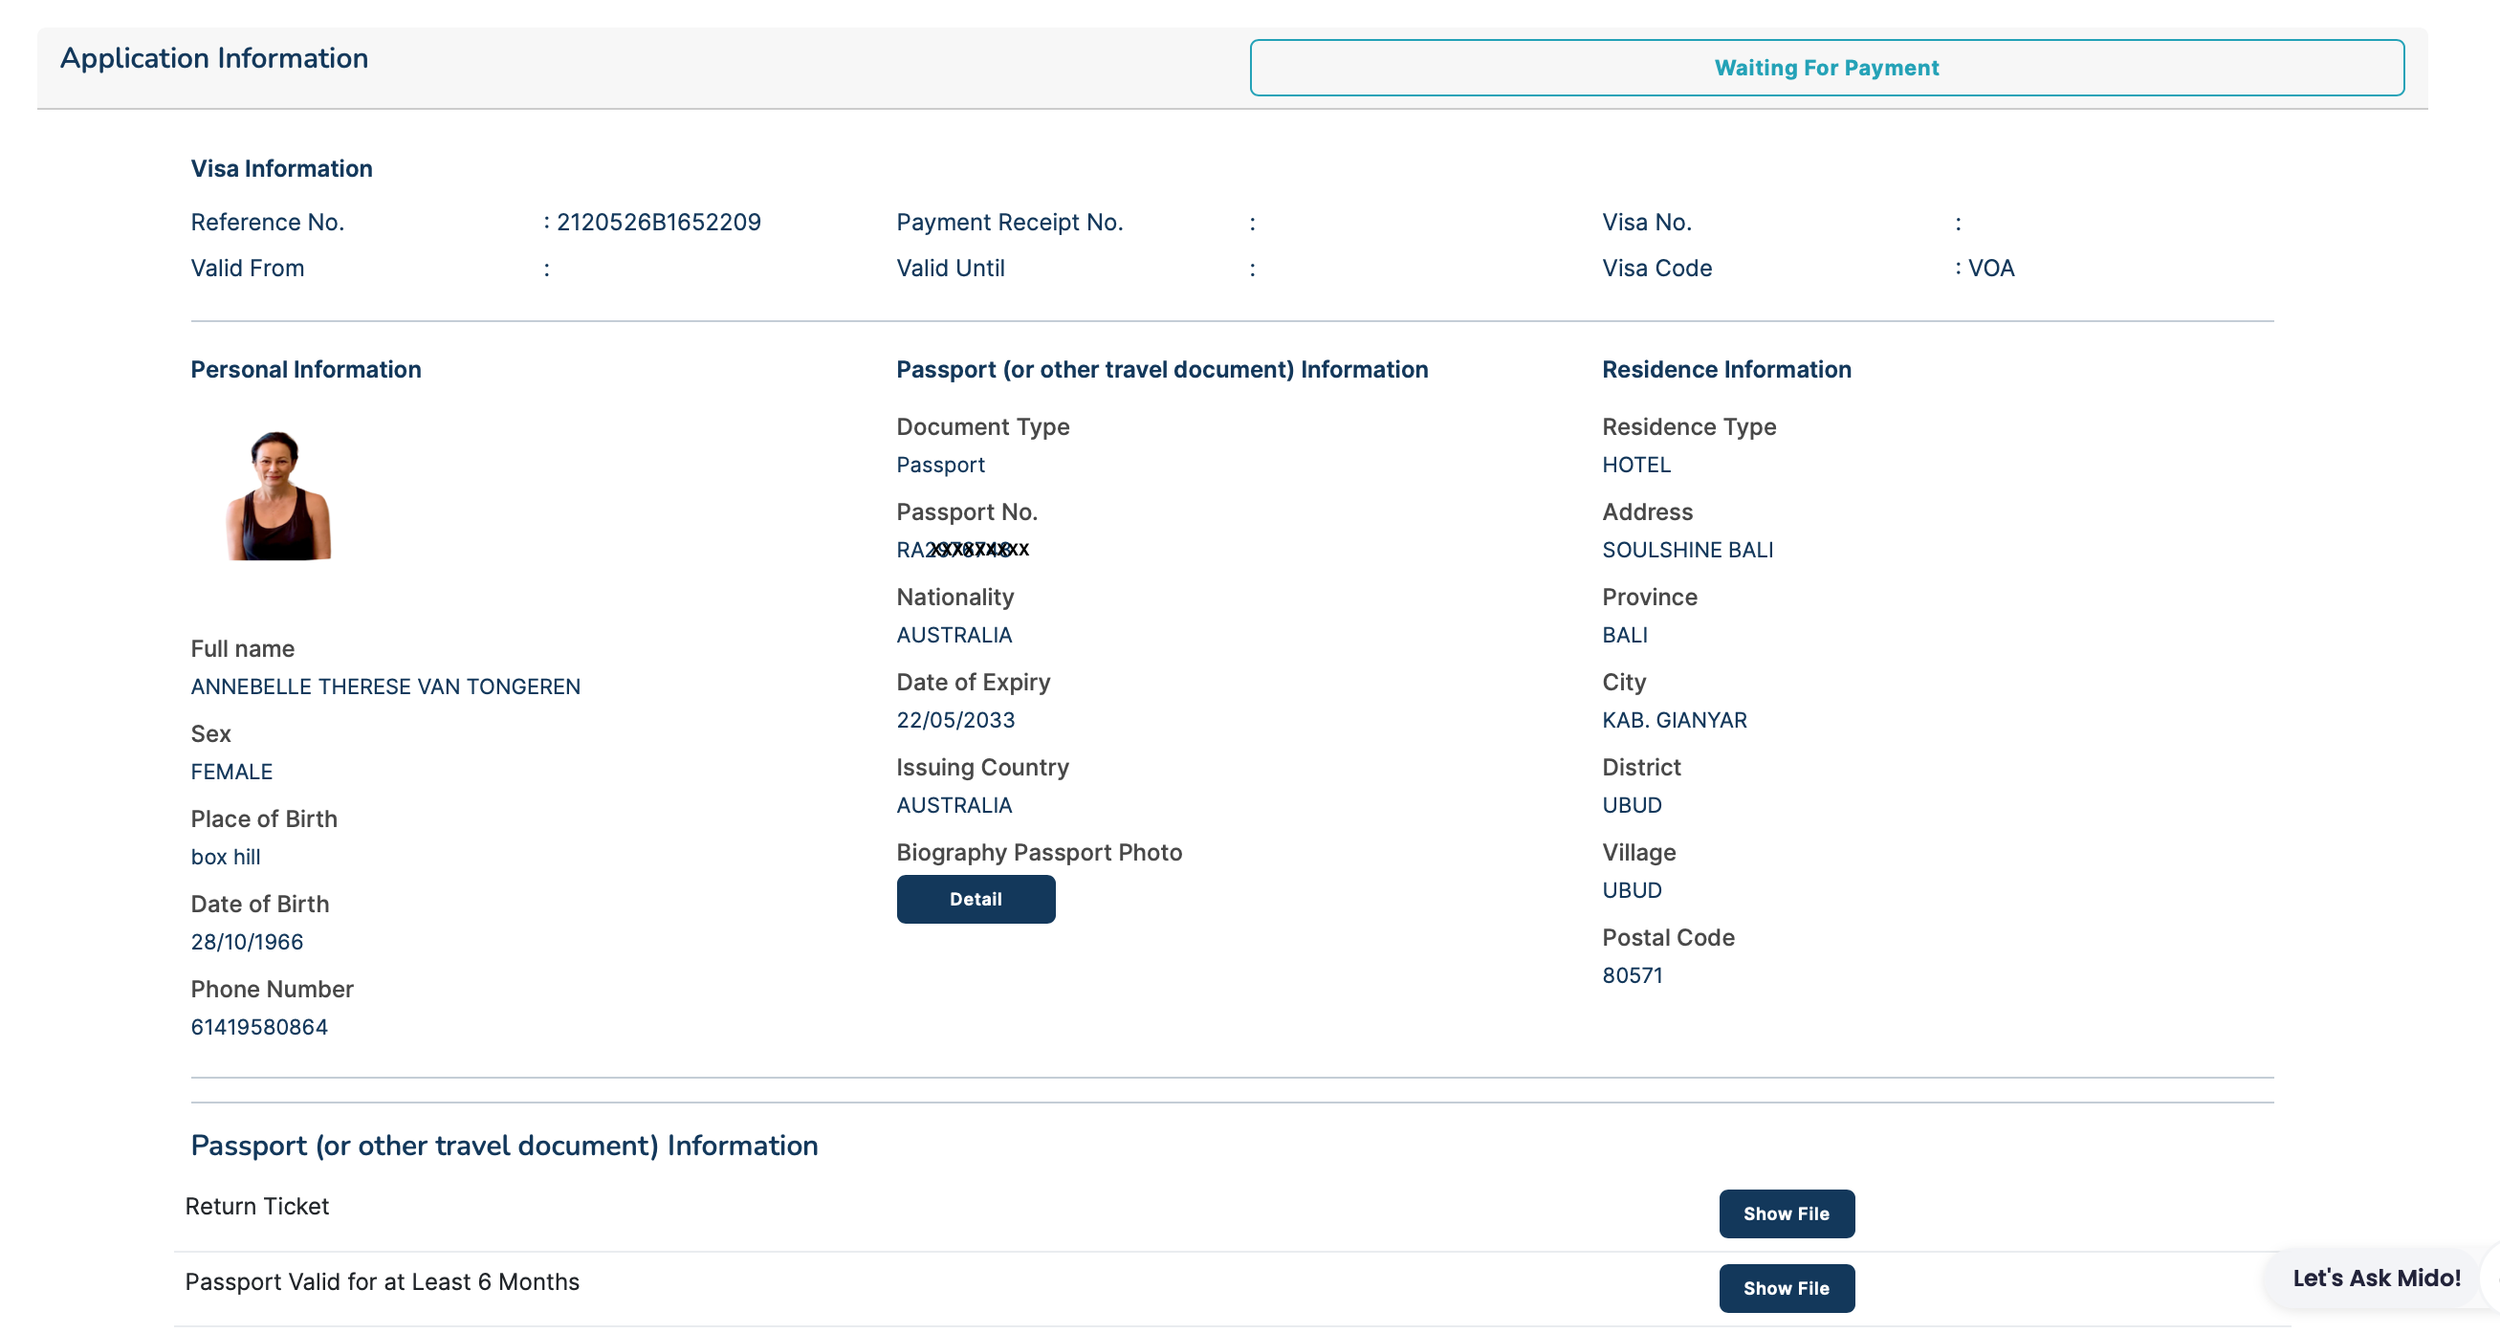
Make sure before you hit “Submit” that you do recheck all the information. I always find that my passport application date comes out wrong. Maybe that’s just me, but please just double check it is all correct before you submit the application. They have little check boxes to help you and every box needs a tick. The image above is what you’ll see online once all your data is uploaded.
It says you can proceed as GUEST but I am doubtful about that…. To move forward I have needed to register an account. That will ask for your email and a password to set it up. I haven’t been successful at being a Guest but perhaps you will have better luck.
AT THIS POINT YOU NEED TO MAKE A CUP OF TEA.
REALLY. The process stops for a pause for five minutes or so. I think it’s a processing pause actually…but who knows!
After five minutes, check your emails.
You may get an email from DIREKTORAT JENDERAL IMIGRASI REPUBLIK INDONESIA with a six digit OTP code to use when prompted when you check your progress… So check your emails for that before coming back to the webpage. When you go to sign in it will ask for this code. Annoyingly, the code is valid for 5 minutes only so timing is critical.
You will get an a different email from DIREKTORAT JENDERAL IMIGRASI REPUBLIK INDONESIA with a button labeled “View Batch”. Click that.
When you click on “View Batch” it takes you to a list. Then click on the application number and use the OTP code from your email.
Then you should be taken to the payment page
PLEASE DON’T BE CONCERNED THE PAYMENT PORTAL IS FINPAY. THIS IS CORRECT. See pic below….
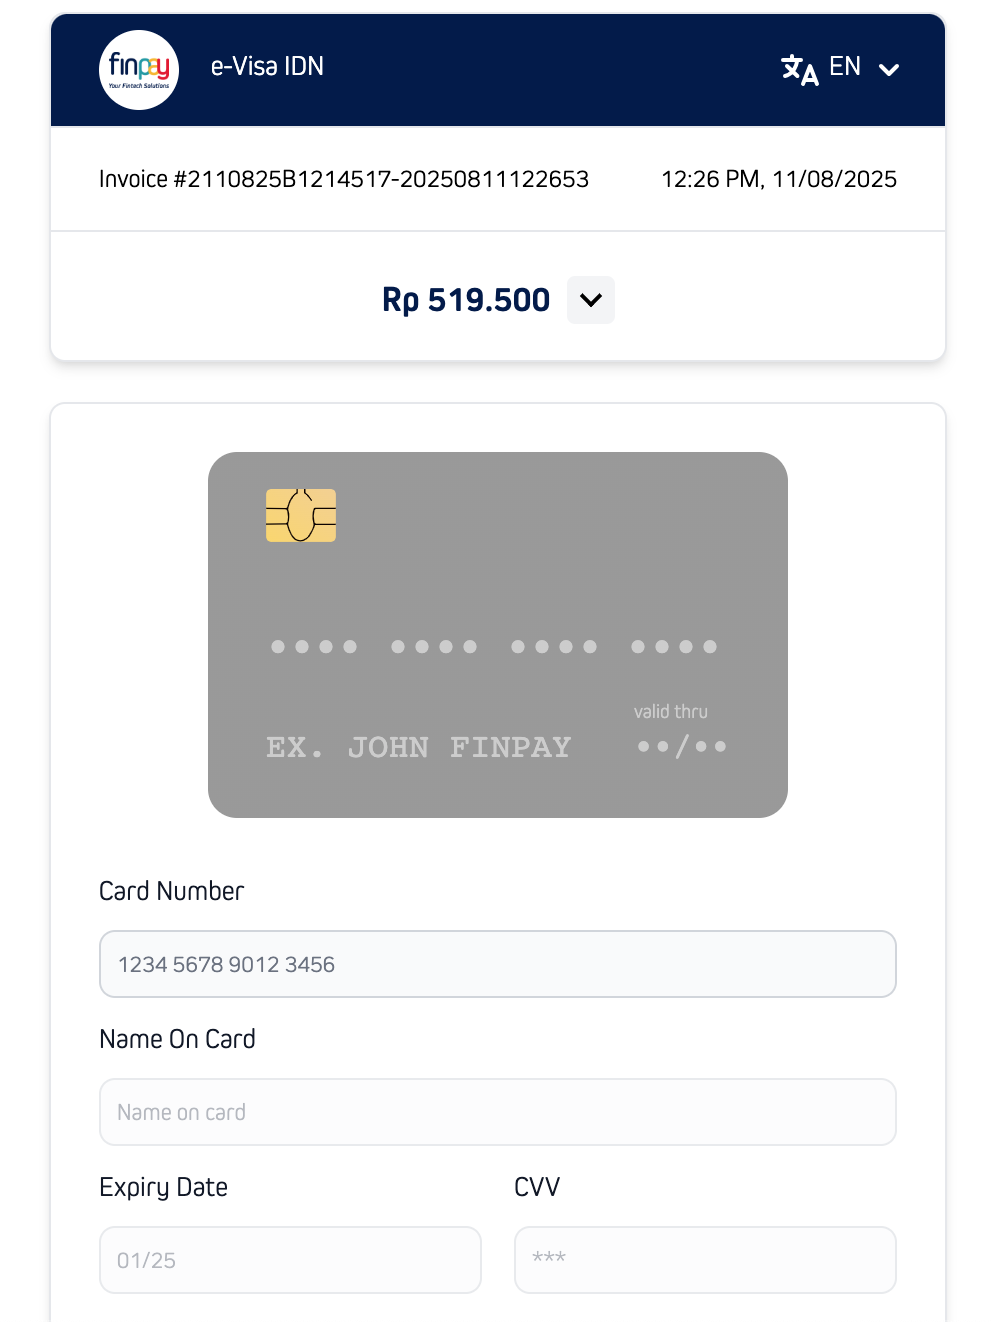
Once you have entered your credit card details, the next screen where you submit the payment needs you to scroll right to the bottom the list. If you don’t do that you wont be able to keep going with the payment process.
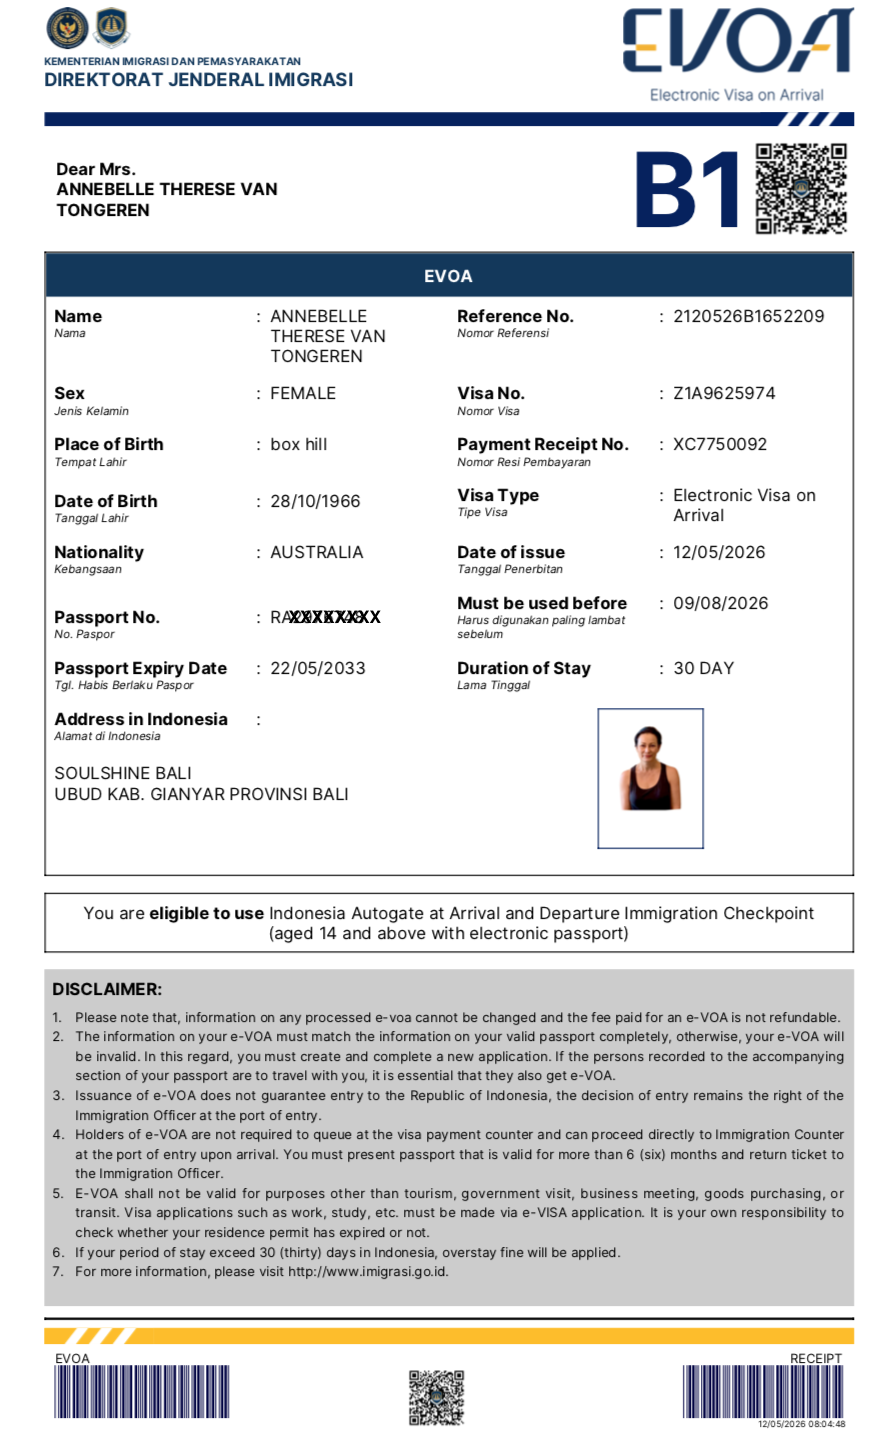
At the end of the application, you will be emailed your EVOA B1 Visa. Please ignore the DOWNLOAD button in the email ( as it never works!! ) and scroll to the bottom of the email where you’ll see the PDF of your EVOA as an attachment. Open that.
MAKE SURE YOU PRINT THE CONFIRMATION EMAIL AND THE PDF ATTACHED TO IT AND SAVE THESE IN YOUR PHONE AS WELL.
Your visa will look like this.
VISA #2. Bali Tourist Levy
There is now a mandatory tourism levy for travellers visiting Bali.
Apply for this on the same day as the EVOA B1 ( above ) so two out of three are done!
Use this link to apply and pay for this visa online https://lovebali.baliprov.go.id/
It should be about $15AU.
If the cost is significantly higher, please let me know so I can help you.
You will receive proof of payment with a QR Code sent via email.
PLEASE BE SURE TO TAKE A SCREENSHOT OF THE QR CODE THAT IS EMAILED TO YOU AFTER THE APPLICATION, AND ALSO PRINT IT OUT AND KEEP IT WITH YOUR TRAVEL DOCUMENTS.
VISA #3. All Indonesia Visa
You can apply online within three days before you depart Australia. It actually blends the Health Check Visa and Customs Declaration. It’s a new process which was introduced at the end of last year.
Use this link to apply for the All Indonesia Visa.
https://allindonesia.imigrasi.go.id/
Choose English as the language of the application in the top right corner of the screen if it comes up as Indonesian as the default language. Mine comes up as English, but your screen might be different to mine.
The question that asks for Port of Arrival should be answered with BALI (DPS) NGURAH RAI.
“Number of Baggage Arriving with You” should include your suitcases and your carry on bags too.
This is for Customs so they want to know how many bags you will have.
So for me, with one suitcase, a carry on case, a laptop bag and my handbag, that is four pieces.
You will need to know your incoming flight number and the seat number too.
You should choose HOLIDAY rather than BUSINESS when you apply. For the address field should just write SOULSHINE BALI.
After your application has been processed you will get an email from Ditjen Imigrasi Info, and it will include a QR Code to be scanned by the Customs officer at Denpasar Airport.
PLEASE BE SURE TO TAKE A PHONE SCREENSHOT OF THE QR CODE THAT IS GENERATED AFTER THE APPLICATION, AND ALSO PRINT THE QR CODE AND KEEP IT WITH YOUR TRAVEL DOCUMENTS.
Position this printed page at the front of your documents because this is likely to be the only QR code they will ask to see at Customs at Denpasar Airport. (You need all three visas but as the others are already linked to your passport you might not be asked about them.)
Also, I want to tell you that you can feel quite smug as you walk past all the people at Denpasar Airport who didn’t apply for this visa online ahead of their flight and are madly scrambling to get it done on the dodgy computers in Arrivals.
Namaste.
***JUST A REMINDER, PLEASE ONLY USE THE LINKS I HAVE GIVEN YOU TO APPLY FOR YOUR VISAS
NAVIGATING DENPASAR AIRPORT
After a long flight, getting through to the other side of Customs is A LOT.
Denpasar Airport is much better than it used to be, but it is still a bit of a challenge as all unfamiliar, international airports are.
Because you will already have organized your visas, the process will be easier than for the people who didn’t. They have long queues ahead!
When you come off the plane, head straight to the Arrivals Hall for the Immigration area. ( There are bathrooms on the way too, just fyi.)
The sign to look for says Imigrasi.


Look for a blue sign that says Electronic Visa, directing you to the Autogates, as you ignore the long queue of people who didn’t get their visa online before flying….!
You will use the green lit automated e-gates ( see pic below) for immigration arrivals as you are a traveler with e-VOA B1 Visa, provided you have an electronic passport with the chip symbol.

If you don't have this kind of passport or prefer not to use the Autogates, you can use the standard immigration lines.
When you have passed through Immigration go through Duty Free and towards the luggage carousels. (There are monitors around telling you which carousel has been allocated to your flight.)
Grab a trolley and collect your luggage. And trust me, you do not need a porter here or on the other side of Customs so just keep saying “No thank you” and keep moving.
You might have to show the luggage tags to staff before exiting, so keep them on.

Customs is after Carousel number 3.
The entrance to Customs has dark brown panels.
Go through to Customs towards the exit sign and show them the All Indonesia QR code, your passport and boarding pass.
You might have to put all your luggage and hand luggage through a scanner, the same as the ones you use when departing a country. So you’ll have to put the trolley aside for this.
If the officers don’t pick you for a luggage check you can exit the airport building – you are through! But you’ll walk through another long and winding Duty Free area before you see daylight. The last thing you’ll see before the drivers is a Starbucks on the right. Then you know you have arrived!

There will be many, many drivers waiting to collect their people. Your driver will be holding a sign and will find you. Breathe…
MONEY
I would suggest getting your cash at your local bank. Here on the Bass Coast, my bank likes at least a week’s notice for the exchange. I imagine it’s easier in the city though.
There are money changers at the international airports in Australia too of course.
That’s an easy way to do it.
If you must do it at Denpasar Airport, you’ll find around seven ATMs and eight money changers on the first floor.
The rates tend to be competitive there with so many options available.
Call me an old fashioned gal but I prefer to get my money sorted on Aussie soil.
When you are exploring Ubud, you’ll want cash for the market stalls for sure. Most shops and cafes take credit cards.
And if you need to use an ATM, please keep your wits about you and check for anything that looks a bit suspicious. Cover your hand using your PIN, and keep your receipts.
Annoyingly, most ATMs limit how much you can take out at one time. Some limit it to RP 1,000,000 ($100AU) and some RP 2,000,000. ($200AU)
Basically, the exchange rate means you add four zeros to the price you pay for everything.
$10AU is about RP 100,000
$50AU is about RP 500,000
And $100AU is one million RP.
Yes, you may find yourself swanning around with a few million in your crossbody bag, feeling like a superstar.
You might want to keep little money like RP 20,000 and RP 50,000 notes in your wallet for tipping. RP 50,000 isn’t much to us, but it’s a lot to the Balinese.
5kg of rice actually.
COMMUNICATIONS
In Bali there is wifi in so many public areas and cafes, and of course at Soulshine too.
To be honest, on many trips I have had my phone on Airplane mode the whole time and just used wifi to access Messenger for calls and texts home. I didn’t need International Roaming but recently I started using an e-sim from Ubigi and found it pretty straightforward and well priced.
You just have to make sure you follow all the instructions to set it up properly in your phone. And it’s ESSENTIAL to have the QR code which is generated when your order the e-sim, so if this isn’t in your confirmation email please be sure to contact them and get one.
I got a 3GB e-sim for $7USD and that was more than enough for my needs. I only used it to book Grab cars and access maps etc., otping for using wifi when it was available. Bali is great for wifi access by the way.
Also, Ubigi gave me a discount code to offer friends which gives you 20% off your first order. The code is P4GT9UCK.
The e-sim only becomes active once you arrive in Indonesia so you can arrange this well ahead to time and let it be until you land at Denpasar.
Ubigi’s app would need to be installed in your phone. You can delete it once you have arrived home if you like. And of course you can choose other suppliers but I thought I would just share my thumbs up for this one as it was pretty easy to work with!
I didn’t provide the IMEI number of my phone as I wasn’t clear about whether I needed to or not. All went well….so….. I will do the same this time. ( The question around EMEI in the application form is very strangely worded so I basically gave up!)
If you’re concerned, dial *#06# before you leave Australia, and your phone will show you your EID, EMEI AND EMEI2 numbers.
TAKE A SCREENSHOT AND SAVE IT IN YOUR TRAVEL DOCUMENTS IN CASE YOU NEED THIS INFORMATION.
Or you can use your existing mobile data plan on International Roaming but PLEASE make sure you are across the charges you will incur so you don’t come home to bill shock!
WHATS APP
Please install WhatsApp in your phone, as it is handy in Bali when wifi or mobile data is available.
Everybody seems to use WhatsApp as the main communications platform in Asia, and as a group, this is how we will stay in touch with each other before we leave home and during our time away.
Once you have installed WhatsApp, please add these contacts in:
Annebelle van Tongeren +61 419 580 864
Martyn Frost is +61 438 270 463
Soulshine +62 853 3349 9499
Once you have put my number in please message me so I can see you are on board!
A LAST WORD
I know this all might sound a bit daunting, but hand on my heart, the process of arriving in Bali and is so much easier than it used to be!
If you follow my instructions, then everything should roll out smoothly and you’ll be sipping a welcome drink by the pool soon enough.
Please reach out with any questions at all so I can help you.